Color Detection

https://github.com/PolyU-Robocon/PolyU_Workshop_OpenCV_2020

checking.py

1
2
3
4
5
6
7
8
9
10
11
12
13
14
15
16
# Import OpenCV
import cv2

# Import platform
import platform

print("---------------------------------------")

# Print my Python version
print("My Python version is:",platform.python_version())

# Print my OpenCV version
print("My OpenCV version is:",cv2.__version__)

print("---------------------------------------")

You should see something like this:

1
2
3
4
---------------------------------------
My Python version is: 3.7.4
My OpenCV version is: 4.4.0
---------------------------------------

Now you should be able to run the other files.

webcam.py

1
2
3
4
5
6
7
8
9
10
11
12
13
14
15
16
17
18
19
20
21
22
# https://opencv-python-tutroals.readthedocs.io/en/latest/py_tutorials/py_gui/py_video_display/py_video_display.html
import numpy as np
import cv2

cap = cv2.VideoCapture(0)

# keep looping
while(True):
# Capture frame-by-frame
ret, frame = cap.read()

# Our operations on the frame come here
#frame = cv2.resize(frame, (848, 480))

# Display the resulting frame
cv2.imshow('frame',frame)
if cv2.waitKey(1) & 0xFF == ord('q'):
break

# When everything done, release the capture
cap.release()
cv2.destroyAllWindows()
  • cap.read() returns a bool (True/False). If frame is read correctly, it will be True. So you can check end of the video by checking this return value.
  • cv2.imshow(title,frame) takes the title as first parameter then frame as second parameter.
  • cap.release() and cv2.destroyAllWindows() are the methods to close video files or the capturing device, and destroy the window, which was created by the imshow method.
  • cv2.resize(frame, (width, height)) allows you to resize the video window.

imagelayers.py

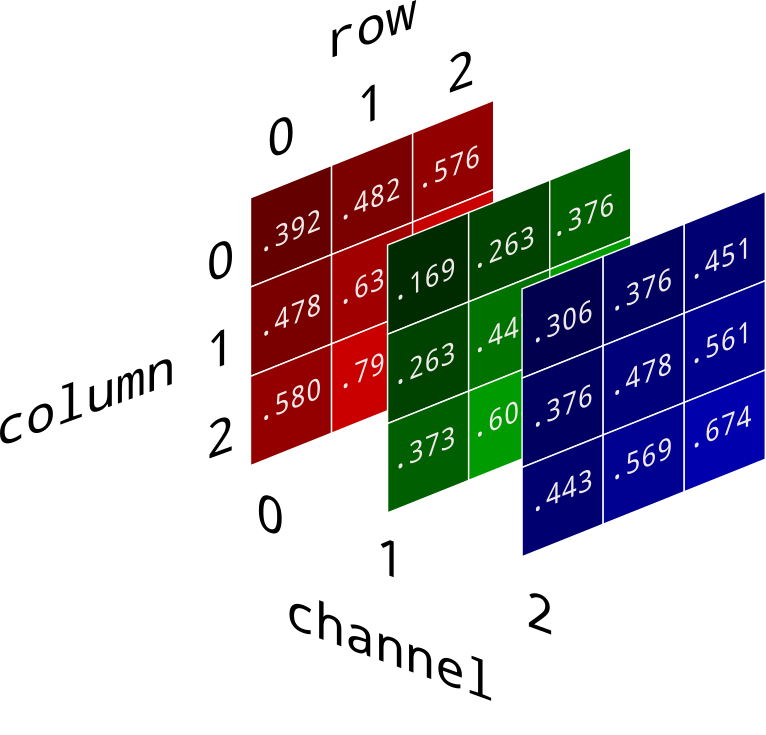
The above image is not correct in OpenCV’s situation.

Why OpenCV store color in BGR?

The reason the early developers at OpenCV chose BGR color format is that back then BGR color format was popular among camera manufacturers and software providers. E.g. in Windows, when specifying color value using COLORREF they use the BGR format 0x00bbggrr.

BGR was a choice made for historical reasons and now we have to live with it.

1
2
3
4
5
6
7
8
9
10
11
12
13
14
15
16
17
18
19
20
21
22
23
24
25
26
27
28
29
30
31
32
33
34
35
36
37
38
39
40
41
import numpy as np
import cv2

cap = cv2.VideoCapture(0)

# keep looping
while(True):
# Capture frame-by-frame
ret, frame = cap.read()

# Our operations on the frame come here
# Note OpenCV store colors in BGR format.

frame = cv2.resize(frame, (848, 480))

R = frame.copy()
R[:,:,0] = 0 # Turn Blue channel to 0
R[:,:,1] = 0 # Turn Green channel to 0
# Now R has Red channel only

G = frame.copy()
G[:,:,0] = 0 # Turn Blue channel to 0
G[:,:,2] = 0 # Turn Red channel to 0
# Now R has Green channel only

B = frame.copy()
B[:,:,1] = 0 # Turn Green channel to 0
B[:,:,2] = 0 # Turn Red channel to 0
# Now R has Blue channel only

# Display the resulting frame
cv2.imshow('frame, Red Channel',R)
cv2.imshow('frame, Green Channel',G)
cv2.imshow('frame, Blue Channel',B)

if cv2.waitKey(1) & 0xFF == ord('q'):
break

# When everything done, release the capture
cap.release()
cv2.destroyAllWindows()
  • frame[column, row, channel]
    • R[:,:,0] means all columns, all rows in the first channel (which is Blue) of the frame R.
  • .copy() is a method in Numpy. It will create a copy of the array you need.

colormasking.py

Why do we use the HSV colour space so often in vision and image processing?

The simple answer is that unlike RGB, HSV separates luma, or the image intensity, from chroma or the color information. This is very useful in many applications. For example, if you want to do histogram equalization of a color image, you probably want to do that only on the intensity component, and leave the color components alone. Otherwise you will get very strange colors.

In computer vision you often want to separate color components from intensity for various reasons, such as robustness to lighting changes, or removing shadows.

1
2
3
4
5
6
7
8
9
10
11
12
13
14
15
16
17
18
19
20
21
22
23
24
25
26
27
28
29
30
31
32
33
34
35
36
37
38
39
40
41
42
43
# import the necessary packages
import numpy as np
import cv2

# define the lower and upper boundaries of the "color" in the HSV color space
colorLower = np.array([173,148,84])
colorUpper = np.array([179,255,255])
# ^ Notice HSV Hue is 0 ~ 179!

# grab the reference to the webcam
cap = cv2.VideoCapture(0)

# keep looping
while True:
# grab the current frame
_, frame = cap.read()

# if we are viewing a video and we did not grab a frame,
# then we have reached the end of the video
if frame is None:
break

# resize the frame, blur it, and convert it to the HSV color space
frame = cv2.resize(frame, (848, 480))
hsv = cv2.cvtColor(frame, cv2.COLOR_BGR2HSV)

# construct a mask for the color
mask = cv2.inRange(hsv, colorLower, colorUpper)

# show the frame to our screen
cv2.imshow("Color", frame)
cv2.imshow("Masked", mask)

# if the 'q' key is pressed, stop the loop
if cv2.waitKey(1) & 0xFF == ord("q"):
break

# stop the camera video stream
cap.release()

# close all windows
cv2.destroyAllWindows()

Why HSV in OpenCV uses 0 - 179 for Hue?

Developers used uchar to store the value.

uchar can only store -127 to 127 which means only 255 values can be stored.

So they decided to just divide the Hue by 2.

  • np.array() creates an array.
  • cv2.cvtColor() allows you to convert a color into another space.
    • cv2.cvtColor(frame, cv2.COLOR_BGR2HSV) from BGR to HSV
  • cv2.inRange(frame, lowerbound, upperbound)
    • For color between lowerbound and upperbound, value become 255 (white)
    • For color not in lowerbound and upperbound, value become 0 (black)

For Tuning the mask color we want, we can use :

Color Tracking

1
2
3
4
5
6
7
8
9
10
11
12
13
14
15
16
17
18
19
20
21
22
23
24
25
26
27
28
29
30
31
32
33
34
35
36
37
38
39
40
41
42
43
44
45
46
47
48
49
50
51
52
53
54
55
56
57
58
59
# import the necessary packages
import numpy as np
import cv2

# define the lower and upper boundaries of the "color" in the HSV color space
colorLower = np.array([173,148,84])
colorUpper = np.array([179,255,255])
# ^ Notice HSV Hue is 0 ~ 179!

# grab the reference to the webcam
cap = cv2.VideoCapture(0)

# keep looping
while True:
# grab the current frame
_, frame = cap.read()

# resize the frame, blur it, and convert it to the HSV color space
frame = cv2.resize(frame, (800, 500))
hsv = cv2.cvtColor(frame, cv2.COLOR_BGR2HSV)

# construct a mask for the color
mask = cv2.inRange(hsv, colorLower, colorUpper)

# find contours in the mask and initialize the current (x, y) center of the ball
cnts = cv2.findContours(mask.copy(), cv2.RETR_EXTERNAL,cv2.CHAIN_APPROX_SIMPLE)

if len(cnts) == 2:
cnts = cnts[0] # For OpenCV v2.4, v4-beta, or v4-official
elif len(cnts) == 3:
cnts = cnts[1] # For OpenCV v3, v4-pre, or v4-alpha

# only proceed if at least one contour was found
if len(cnts) > 0:
# find the largest contour in the mask
c = max(cnts, key=cv2.contourArea)

# use it to compute the minimum enclosing circle
((x, y), radius) = cv2.minEnclosingCircle(c)

# only proceed if the radius meets a minimum size
if radius > 10:
# draw the circle on the frame
cv2.circle(frame, (int(x), int(y)), int(radius),(0, 255, 255), 2)

# show the frame to our screen
cv2.imshow("Color Tracker", frame)
cv2.imshow("Masked", mask)

# if the 'q' key is pressed, stop the loop
if cv2.waitKey(1) & 0xFF == ord("q"):
break

# stop the camera video stream
cap.release()

# close all windows
cv2.destroyAllWindows()

  • cv2.findContours() returns (frame,contours,hierarchy).
    • Note for some versions of opencv might only return (contours,hierarchy).
  • cv2.RETR_EXTERNAL retrieves only the extreme outer contours
    • You could also try with cv2.RETR_LIST, cv2.RETR_CCOMP, or cv2.RETR_TREE.
  • cv2.CHAIN_APPROX_SIMPLE means the algorithm we are using for getting contours.
    • cv2.CHAIN_APPROX_SIMPLE removes all redundant points and compresses the contour, thereby saving memory
    • You could also try with cv2.CHAIN_APPROX_NONE to find all the boundary points
  • https://docs.opencv.org/master/dd/d49/tutorial_py_contour_features.html
  • cv2.circle(frame, center_coordinates, radius, color, thickness) allows you to draw a circle in your window.
    • cv2.circle(frame, (int(x), int(y)), int(radius),(0, 255, 255), 2)

Full Code

1
2
3
4
5
6
7
8
9
10
11
12
13
14
15
16
17
18
19
20
21
22
23
24
25
26
27
28
29
30
31
32
33
34
35
36
37
38
39
40
41
42
43
44
45
46
47
48
49
50
51
52
53
54
55
56
57
58
59
60
61
62
63
64
65
66
67
68
69
70
71
72
73
# import the necessary packages
import numpy as np
import cv2
import imutils
#import time

# define the lower and upper boundaries of the "color" in the HSV color space
#colorLower = np.array([9,156,108])
#colorUpper = np.array([12,255,234])
colorLower = np.array([173,148,84])
colorUpper = np.array([179,255,255])
# ^ Notice HSV Hue is 0 ~ 179!

# grab the reference to the webcam
cap = cv2.VideoCapture(0)

# in case you want to grab the reference to a video
#cap = cv2.VideoCapture("dvd.mp4")

# allow the camera or video file to warm up
#time.sleep(2.0)

# keep looping
while True:
# grab the current frame
_, frame = cap.read()

# if we are viewing a video and we did not grab a frame,
# then we have reached the end of the video
if frame is None:
break

# resize the frame, blur it, and convert it to the HSV color space
frame = imutils.resize(frame, width=600)
blurred = cv2.GaussianBlur(frame, (11, 11), 0) # eliminate noises
hsv = cv2.cvtColor(blurred, cv2.COLOR_BGR2HSV)

# construct a mask for the color
mask = cv2.inRange(hsv, colorLower, colorUpper)

# perform a series of dilations and erosions to remove any small blobs left in the mask
mask = cv2.erode(mask, None, iterations=2)
mask = cv2.dilate(mask, None, iterations=2)

# find contours in the mask and initialize the current (x, y) center
cnts = cv2.findContours(mask.copy(), cv2.RETR_EXTERNAL, cv2.CHAIN_APPROX_SIMPLE)
cnts = imutils.grab_contours(cnts)

# only proceed if at least one contour was found
if len(cnts) > 0:
# find the largest contour in the mask, then use it to compute the minimum enclosing circle
c = max(cnts, key=cv2.contourArea)
((x, y), radius) = cv2.minEnclosingCircle(c)

# only proceed if the radius meets a minimum size
if radius > 10:
# draw the circle on the frame
cv2.circle(frame, (int(x), int(y)), int(radius), (0, 255, 255), 2)

# show the frame to our screen
cv2.imshow("Color Tracker", frame)
cv2.imshow("Masked", mask)

# if the 'q' key is pressed, stop the loop
if cv2.waitKey(1) & 0xFF == ord("q"):
break

# stop the camera video stream
cap.release()

# close all windows
cv2.destroyAllWindows()

What is GaussianBlur?

GuassianBlur is typically used to reduce image noise and reduce detail.

What is Dilation and Erosion, Opening and Closing?
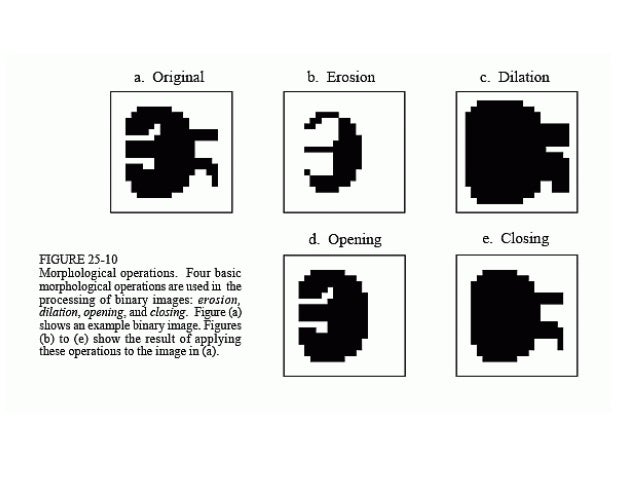
TLDR:

  • Dilation - Add pixels to the boundaries of objects in an image
  • Erosion - Removes pixels at the boundaries of objects in an image
  • Opening - Erosion then Dilation
  • Closing - Dilation then Erosion

Note in OpenCV recognize WHITE as object itself.

So the effect of dilation and erosion might do the reverse of what you expect.

What is imutils?

imutils is A series of convenience functions to make basic image processing functions such as translation, rotation, resizing, skeletonization, and displaying Matplotlib images easier with OpenCV and both Python 2.7 and Python 3.

https://github.com/jrosebr1/imutils/blob/master/imutils/convenience.py

Explaination of imutils.grab_contours():

1
2
3
4
5
6
7
8
9
10
11
12
13
14
15
16
17
18
19
20
21
22
def grab_contours(cnts):
# if the length the contours tuple returned by cv2.findContours
# is '2' then we are using either OpenCV v2.4, v4-beta, or
# v4-official
if len(cnts) == 2:
cnts = cnts[0]

# if the length of the contours tuple is '3' then we are using
# either OpenCV v3, v4-pre, or v4-alpha
elif len(cnts) == 3:
cnts = cnts[1]

# otherwise OpenCV has changed their cv2.findContours return
# signature yet again and I have no idea WTH is going on
else:
raise Exception(("Contours tuple must have length 2 or 3, "
"otherwise OpenCV changed their cv2.findContours return "
"signature yet again. Refer to OpenCV's documentation "
"in that case"))

# return the actual contours array
return cnts

Explaination of imutils.resize():

1
2
3
4
5
6
7
8
9
10
11
12
13
14
15
16
17
18
19
20
21
22
23
24
25
26
27
28
29
30
31
def resize(image, width=None, height=None, inter=cv2.INTER_AREA):
# initialize the dimensions of the image to be resized and
# grab the image size
dim = None
(h, w) = image.shape[:2]

# if both the width and height are None, then return the
# original image
if width is None and height is None:
return image

# check to see if the width is None
if width is None:
# calculate the ratio of the height and construct the
# dimensions
r = height / float(h)
dim = (int(w * r), height)

# otherwise, the height is None
else:
# calculate the ratio of the width and construct the
# dimensions
r = width / float(w)
dim = (width, int(h * r))

# resize the image
resized = cv2.resize(image, dim, interpolation=inter)

# return the resized image
return resized