Azure-Kinect + ROS Guide

Pre-requisites:

  • Already Setup ROS + Azure-Kinect
  • Already Setup Azure-Kinect ROS driver

What sensor does kinect have?

  • IR Camera
  • Depth Camera
  • RGB Camera
  • IMU
  • Microphone array

In this article we will focus on how to mess with the camera.

IR Camera

  • IR camera is basically the grayscale subject to temperture.
    • Usually used on human

RGB Camera

  • the Standard RGB camera.
    • RGB Image is a 3D array, 3 channels of a 2D array.

Depth Camera

  • Depth is used to measure the distance.
    • You need to configure the max depth
    • Depth Image is a 2D array, each value is the distance of that pixel.

This image demonstrates the camera’s field-of-view as seen from the front at a distance of 2000 mm.

When depth is in NFOV mode, the RGB camera has better pixel overlap in 4:3 than 16:9 resolutions.

What is the use of Azure-Kinect ROS driver?

With Azure-Kinect ROS driver, basically it act as publishers that publish different nodes. All we need to do is to catch the message in corresponding topic using a subscriber.

To deal with ROS image

To carry image processing, We can use opencv. First we need to convert ROS image to OpenCV image.

Some useful API

  • sensor_msgs - This package defines messages for commonly used sensors, including cameras and scanning laser rangefinders.
  • cv_bridge - This package converts between ROS Image messages and OpenCV images.
  • image_transport (C++ only) - This package provides transparent support for transporting images in low-bandwidth compressed formats.
  • message_filters - Used when you want to have multiple subscribers.

cv_bridge can selectively convert color and depth information. In order to use the specified feature encoding, there is a centralized coding form:

  • mono8: CV_8UC1, grayscale image
  • mono16: CV_16UC1, 16-bit grayscale image
  • bgr8: CV_8UC3 with color information and the order of colors is BGR order
  • rgb8: CV_8UC3 with color information and the order of colors is RGB order
  • bgra8: CV_8UC4, BGR color image with alpha channel
  • rgba8: CV_8UC4, CV, RGB color image with alpha channel

Create a New ROS Package in your Workspace

Syntax:

1
catkin_create_pkg <pkg name> [dependencies]

Go to <your workspace>/src :

1
catkin_create_pkg kinect_handler image_transport cv_bridge sensor_msgs rospy roscpp std_msgs 

Configure launch file

Configuring Kinect Through Included Launch file

We won’t want to mess with the ROS driver (driver.launch) file. That’s why we make our own launch file.

Your custom launch file:

1
2
3
4
5
6
7
8
9
10
11
12
13
14
15
16
17
18
19
20
21
22
23
24
25
26
27
28
29
30
31
<launch>
<include file="$(find azure_kinect_ros_driver)/launch/driver.launch">
<arg name="depth_enabled" value="true" />
<arg name="depth_mode" value="NFOV_UNBINNED" />
<arg name="color_enabled" value="true" />
<arg name="color_format" value="bgra" />
<arg name="color_resolution" value="1536P" />
<arg name="fps" value="30" />
<arg name="point_cloud" value="true" />
<arg name="rgb_point_cloud" value="true" />
<arg name="point_cloud_in_depth_frame" value="false" />
<arg name="required" value="false" />
<arg name="sensor_sn" value="" />
<arg name="recording_file" value="" />
<arg name="recording_loop_enabled" value="false" />
<arg name="body_tracking_enabled" value="false" />
<arg name="body_tracking_smoothing_factor" value="0.0" />
<arg name="rescale_ir_to_mono8" value="false" />
<arg name="ir_mono8_scaling_factor" value="1.0" />
<arg name="imu_rate_target" value="0"/>
<arg name="wired_sync_mode" value="0"/>
<arg name="subordinate_delay_off_master_usec" value="0"/>
</include>
<!-- Your node -->
<node
pkg="<your pkg name>"
type="<yourscript.py> or <yourcpp>"
name="<yourscript or yourcpp>"
output="screen"
/>
</launch>

Explaination of some important args:

  • depth_enabled - Enable or disable the depth camera
  • depth_mode - Set the depth camera mode, which affects FOV, depth range, and camera resolution. See Azure Kinect documentation for full details.
    • Valid options:
      • NFOV_UNBINNED
      • NFOV_2X2BINNED
      • WFOV_UNBINNED
      • WFOV_2X2BINNED
      • PASSIVE_IR
  • color_enabled - Enable or disable the color camera
  • color_format - The format of RGB camera.
    • Valid options: bgra, jpeg
  • color_resolution - Resolution at which to run the color camera
    • Valid options: 720P, 1080P, 1440P, 1536P, 2160P, 3072P
  • fps - FPS to run both cameras at. See Azure Kinect documentation for full details.
    • Valid options: 5, 15, and 30
  • point_cloud - Generate a point cloud from depth data. Requires depth_enabled
  • rgb_point_cloud - Colorize the point cloud using the RBG camera. Requires color_enabled and depth_enabled
  • point_cloud_in_depth_frame - Whether the RGB pointcloud is rendered in the depth frame (true) or RGB frame (false). Will either match the resolution of the depth camera (true) or the RGB camera (false).
  • required - Argument which specified if the entire launch file should terminate if the node dies
  • sensor_sn - Sensor serial number. If none provided, the first sensor will be selected

Further details can be checked in the ROS drivers’ launch file.

Writing a Subscriber to get rgb image

Reference : Working With ROS and OpenCV in ROS Noetic

C++

1
2
3
4
5
6
7
8
9
10
11
12
13
14
15
16
17
18
19
20
21
22
23
24
25
26
27
28
29
30
31
32
33
34
35
36
37
38
39
40
41
42
43
44
45
46
47
48
49
50
51
52
53
#include <ros/ros.h>
#include <image_transport/image_transport.h>
#include <opencv2/highgui/highgui.hpp>
#include <cv_bridge/cv_bridge.h>

void imageCallback(const sensor_msgs::ImageConstPtr& msg)
{
// Pointer used for the conversion from a ROS message to
// an OpenCV-compatible image
cv_bridge::CvImagePtr cv_ptr;

try
{

// Convert the ROS message
cv_ptr = cv_bridge::toCvCopy(msg, "bgr8");

// Store the values of the OpenCV-compatible image
// into the current_frame variable
cv::Mat current_frame = cv_ptr->image;

// Display the current frame
cv::imshow("view", current_frame);

// Display frame for 10 milliseconds
cv::waitKey(10);
}
catch (cv_bridge::Exception& e)
{
ROS_ERROR("Could not convert from '%s' to 'bgr8'.", msg->encoding.c_str());
}
}

int main(int argc, char **argv)
{
// The name of the node
ros::init(argc, argv, "frame_listener");

// Default handler for nodes in ROS
ros::NodeHandle nh;

// Used to publish and subscribe to images
image_transport::ImageTransport it(nh);

// Subscribe to the /rgb/image_raw topic
image_transport::Subscriber sub = it.subscribe("rgb/image_raw", 1, imageCallback);

// Make sure we keep reading new video frames by calling the imageCallback function
ros::spin();

// Close down OpenCV
cv::destroyWindow("view");
}

Note for C++ you need to edit the package level CMakeLists.txt.

This code goes under the find_package(catkin …) block.

1
find_package(OpenCV)

This code goes under the include_directories() block.

1
include_directories(${OpenCV_INCLUDE_DIRS})

Lets say we have a file in src called webcam_pub_cpp.cpp.

Add these to the bottom.

1
2
add_executable(webcam_pub_cpp src/webcam_pub_cpp.cpp)
target_link_libraries(webcam_pub_cpp ${catkin_LIBRARIES} ${OpenCV_LIBRARIES})

More info about CMakeLists.txt in ROS

Remember to catkin_make.

Python

1
2
3
4
5
6
7
8
9
10
11
12
13
14
15
16
17
18
19
20
21
22
23
24
25
26
27
28
29
30
31
32
33
34
35
36
37
38
39
40
41
42
#!/usr/bin/env python

import rospy
from sensor_msgs.msg import Image
from cv_bridge import CvBridge
import cv2 #3.2.0

def callback(data):

#use CvBridge to convert between ROS and OpenCV images
br = CvBridge()

#convert ROS image message to OpenCV image (BGRA)
current_frame = br.imgmsg_to_cv2(data)

bgr_frame = cv2.cvtColor(current_frame, cv2.COLOR_BGRA2BGR)

# Output debugging information to the terminal
log = rgb_frame
rospy.loginfo(log)

cv2.imshow("kinect camera", bgr_frame)

cv2.waitKey(1)

def receive_message():

# Tells rospy the name of the node.
# Anonymous = True makes sure the node has a unique name. Random
# numbers are added to the end of the name.
rospy.init_node('kinect_sub_py', anonymous=True)

# Node is subscribing to the rgb/image_raw topic
rospy.Subscriber('rgb/image_raw', Image, callback)

# spin() simply keeps python from exiting until this node is stopped
rospy.spin()

cv2.destroyAllWindows()

if __name__ == '__main__':
receive_message()

Note for python script you only need to mark the script as executable. You don’t even need to do catkin_make .

To make the file an executable:

1
chmod +x <your program>.py

Using a depth camera in ROS to get distance

If you put 32FC1 the values of the pixel of the image should be already the distance in meters.

1
2
3
4
5
6
7
8
9
10
11
12
13
14
15
16
17
18
19
20
21
22
23
24
25
26
27
28
29
30
31
32
33
34
35
36
37
38
39
40
41
42
43
44
45
46
47
48
49
50
51
52
53
54
55
56
57
58
59
60
61
62
63
64
65
66
67
68
69
70
71
72
73
74
75
76
77
78
79
80
81
82
83
84
#!/usr/bin/env python

import rospy
import numpy as np
from sensor_msgs.msg import Image
from cv_bridge import CvBridge
import cv2 #3.2.0
import imutils

def get_distance(frame):
img_height = frame.shape[0]
img_width = frame.shape[1]
x_center = img_width/2
y_center = img_height/2
#rospy.loginfo("The center pixel value is: %s", frame[y_center][x_center])
distance = float(frame[y_center][x_center])*100.0
distance_arr = frame[y_center-10:y_center+11,x_center-10:x_center+11]
distance_arr = distance_arr.flatten()
median = np.median(distance_arr)
rospy.loginfo("The median distance is: %s cm", median*100.0)
rospy.loginfo("The distance of center pixel is: %s cm", distance)

return distance

def draw_crosshair(frame, crosshair_size=5, crosshair_color=(255,0,0), stroke=1):
img_height = frame.shape[0]
img_width = frame.shape[1]
x_center = img_width/2
y_center = img_height/2
cv2.line(frame, (x_center-crosshair_size,y_center-crosshair_size), (x_center+crosshair_size,y_center+crosshair_size), crosshair_color, stroke)
cv2.line(frame, (x_center+crosshair_size,y_center-crosshair_size), (x_center-crosshair_size,y_center+crosshair_size), crosshair_color, stroke)
cv2.rectangle(frame, (x_center-crosshair_size,y_center-crosshair_size), (x_center+crosshair_size,y_center+crosshair_size), (255,0,0), 1)

def callback(data):

#use CvBridge to convert between ROS and OpenCV images
br = CvBridge()

#convert ROS image message to OpenCV image
current_frame = br.imgmsg_to_cv2(data, desired_encoding="32FC1")

#resize image
current_frame = imutils.resize(current_frame, width=600)
current_frame = cv2.GaussianBlur(current_frame, (5,5) , 0)

n_bgr_img = cv2.cvtColor(current_frame, cv2.COLOR_GRAY2BGR)

distance = get_distance(current_frame)

bgr_img = cv2.cvtColor(current_frame, cv2.COLOR_GRAY2BGR)

draw_crosshair(bgr_img, crosshair_size=10, crosshair_color=(0,0,255), stroke=1)

if(distance != 0.0):
cv2.putText(bgr_img, str(distance) + " cm", (50,50), cv2.FONT_HERSHEY_SIMPLEX, 1, (255,0,0), 2, cv2.LINE_AA, False)
else:
cv2.putText(bgr_img, "Too Close/Far! Out of Range!", (50,50), cv2.FONT_HERSHEY_SIMPLEX, 1, (0,0,255), 2, cv2.LINE_AA, False)

cv2.imshow("depth camera", bgr_img)

cv2.imshow("depth camera (no filter)", n_bgr_img)

cv2.waitKey(1)


def receive_message():

# Tells rospy the name of the node.
# Anonymous = True makes sure the node has a unique name. Random
# numbers are added to the end of the name.
rospy.init_node('kinect_sub_py', anonymous=True)

# Node is subscribing to the /depth_to_rgb/image_raw topic
rospy.Subscriber('depth_to_rgb/image_raw', Image, callback)

# spin() simply keeps python from exiting until this node is stopped
rospy.spin()

cv2.destroyAllWindows()

if __name__ == '__main__':
receive_message()

Depth Pro-processing

https://github.com/microsoft/Azure_Kinect_ROS_Driver/issues/170

Writing Multiple Subscribers to get rgb and depth image

Adding message_filters dependency to package

Simply edit the <your package>/package.xml

How to add a system dependency to a package

1
<build_depend>message_filters</build_depend>

Code Implementation

1
2
3
4
5
6
7
8
9
10
11
12
13
14
15
16
17
18
19
20
21
22
23
24
25
26
27
28
29
30
31
32
33
34
35
36
37
38
39
40
41
42
43
44
45
46
47
48
49
50
51
52
53
54
55
56
57
58
#!/usr/bin/env python

import rospy
import message_filters # To Achieve Multiple subscriber
import numpy as np
from sensor_msgs.msg import Image
from cv_bridge import CvBridge
import cv2 #3.2.0
import imutils

class Kinect_Node(object):
def __init__(self):

#use CvBridge to convert between ROS and OpenCV images
self.br = CvBridge()

# Node is subscribing to the rgb/image_raw topic
self.rgb_sub = message_filters.Subscriber('rgb/image_raw', Image)

# Node is subscribing to the /depth_to_rgb/image_raw topic
self.depth_sub = message_filters.Subscriber('depth_to_rgb/image_raw', Image)


def callback(self, ros_rgb, ros_depth):

#convert ROS image message to OpenCV image
depth_frame = self.br.imgmsg_to_cv2(ros_depth, desired_encoding="32FC1")
rgb_frame = self.br.imgmsg_to_cv2(ros_rgb, "bgr8")

#resize image
depth_frame = imutils.resize(depth_frame, width=600)
rgb_frame = imutils.resize(rgb_frame, width=600)

depth_frame = cv2.cvtColor(depth_frame, cv2.COLOR_GRAY2BGR)
#rgb_frame = cv2.cvtColor(rgb_frame, cv2.COLOR_BGRA2BGR)

#If we want to stablize, don't use imshow and waitKey(1). Use a publisher to send the data out and use rqt_gui to see the frame.
cv2.imshow("depth camera", depth_frame)
cv2.imshow("rgb camera", rgb_frame)

cv2.waitKey(1)

def main():

my_node = Kinect_Node()
# Tells rospy the name of the node.
# Anonymous = True makes sure the node has a unique name. Random
# numbers are added to the end of the name.
rospy.init_node("kinect_sub_py", anonymous=True)

ts = message_filters.ApproximateTimeSynchronizer([my_node.rgb_sub, my_node.depth_sub], 10, 0.1)
ts.registerCallback(my_node.callback)
# spin() simply keeps python from exiting until this node is stopped
rospy.spin()


if __name__ == '__main__':
main()

Writing a Simple Object Detector

Reference : CSDN: 運動目標檢測的四種方法

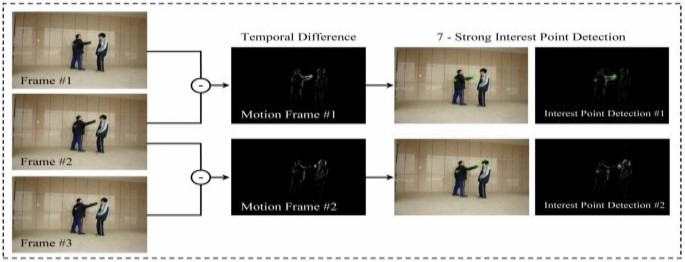
Common ways to track a moving object:

  • Temporal Difference (連續幀間差分法)
    • 2-Frame Difference
    • 3-Frame Difference
  • Background Subtraction (背景差分法)

Implementations of Simple Object Detector

Temporal Difference. Basically using 2 Images in different frames FF (usually nn and n1n-1 frame). Subtraction of FnF_n and Fn1F_{n-1} would yield a difference image DD . Then apply Threshold to the difference image to get the tracking mask. Using a 3-Frame Difference (FnF_n, Fn+1F_{n+1}, Fn1F_{n-1}) would yield a better result. Usually this algorithm is used with other algorithm.

Background Subtraction. Basically using 2 Images of Background frame and Current Frame. Apply Gaussian blue to both frames, then do a Subtraction would yield a difference image DD . Then apply Threshold to the difference image to get the tracking mask. Commonly used in real-time tracking because only require less computation. The only requirement is the camera must be static. Everything (including Lights) in the background must be stationary. Only the objects can move.

In Code Implementation of Background Subtraction

You might need to let the camera warm up before capturing the background image.

Why are webcam images taken with Python so dark?